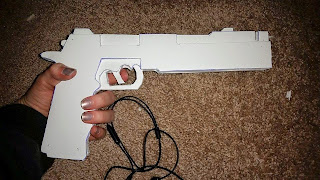
First off, this was my first experience constructing any type of gun and I had no idea how to go about it. I did a lot of Googling and the most useful link for me as a beginner was this one here. There were a few templates in the downbar that really gave me an idea of where to get started. I didn't print them out or trace them, but they were enough of a visual guide for me to freehand my own templates and I'd highly recommend checking out the link if this post doesn't provide enough info.
Here are my templates. I sketched them out using a roll of parchment paper so that I could see all the parts lined up, but I'd imagine regular paper would also work.
The guns are made almost entirely of layered foam poster board. I bought mine at Hobby Lobby for somewhere between 3 to 6 dollars and chose two different thicknesses: a half-inch thick board and a thinner one with an adhesive backing. The adhesive is optional and was unintentional on my part but turned out to be pretty useful because I didn't have to take the time to glue each individual layer together. I traced the templates out on the foam board and lined all the pieces up using the half-inch board for the innermost layer of each gun and the adhesive board for the rest.
The handle is covered in a thin layer of balsa wood (also from Hobby Lobby) which I glued on to either side.
I sketched out some detailing lines on either side which I later engraved using a thin etching tip and a Dremel. I also used a wider Dremel head to drill a hole in the tip of the gun for a slightly more realistic look. You can see the sketched lines on the unfinished gun versus the finished detailing here.
The cameos were just plastic buttons I bought from JoAnn Fabrics. I gouged an indent in the balsa wood where I wanted the loop of the button to fit and then glued them down with contact cement. I used a wood stain to darken the balsa. My guns took a bit of damage after two conventions in a row and so I'd recommend using a sealer of some sort to prolong prop life if these are being made as more than just decoration. Balsa wood is soft and kind of spongy and, as I discovered, chips and dents fairly easily if left unprotected.
The rivets in the guns are made using grommets which I assume are meant to be used for corsets and other lace-up garments. I just glued them down. They may fit securely without glue at first, but I lost a few of mine at ECCC throughout the course of the day.
I painted the cameos with acrylic paint and used a nail polish topcoat to seal them. I rubbed a little more black and brown acrylic over the buttons after they'd dried to give them a more weathered appearance.
Before and after weathering the cameo:
I used spray paint on Ivory and black PlastiDip on Ebony (make sure to put masking tape over your handguards before doing any painting, obviously) and didn't think to do much in the way of priming the edges.
In hindsight, I'd highly recommend using a sandable wood filler on all edges that expose the foam and then use a wood glue or something similar to seal it down after it's sanded and dried and before using any kind of spray paint or sealant on your props. The exposed foam reacts to aerosol by bubbling and melting down a little and it made the undersides of both weapons a little pockmarked looking.
And here are the finished guns! I hope this tutorial helps :) Thanks for reading!


